THE CLASH AT CHOUЇGUI PASS
Today marks the anniversary of the first clash between US and German tanks (but not tankers, as US crews had fought in British lend-lease vehicles prior), which occurred in the mountains of Tunisia on Thanksgiving day, 26 November, 1942, at the western exit of the Tine River Valley known as Chouïgui Pass.
BACKGROUND TO THE BATTLE
On November 8, 1942, joint US and British forces invaded the French North African colonies of Morocco and Algeria in Operation Torch. The invasion was an enormous strategic undertaking to establish a new base of operations deep behind Rommel’s Afrika Korps. But the allies landed in only two of the three French North African colonies – the eastern most colony, Tunisia, was considered to be too far into Axis controlled sea space to risk an invasion fleet.
After brief resistance, the French forces in Morocco and Algeria capitulated to the Allies, and immediately began re-organizing to fight along side the US and British troops against the Germans. But within just days of the Torch landings, German forces began established an airhead around the major Tunisian cities of Tunis and Bizerte. The race was on to see which side could build up forces in Tunisia faster. German and Italian forces came by air and sea from Italy and Sicily, while US and British forces marched overland from Algeria.
On 11 November, 1942, General Eisenhower, commander of the joint Allied forces in French North Africa, organized the 1st Army under British General Anderson, and entrusted it with the task of seizing Tunisia. On 14 November Anderson set his troops in motion, sending an “Eastern Task Force” from Algiers towards the Tunisian frontier with orders to march on Bizerte and Tunis.
The Eastern Task Force formed three separate columns. Farthest inland to the south was a column composed primarily of the British 11th Infantry Brigade. North, along the cost itself was a column built around the British 36th Infantry Brigade. Between these two, crossing mountainous terrain with no railroads and few west-east roads, was a mobile group called “Blade Force”, which had only 2,000 infantry but over 100 tanks, more than half of which were American.
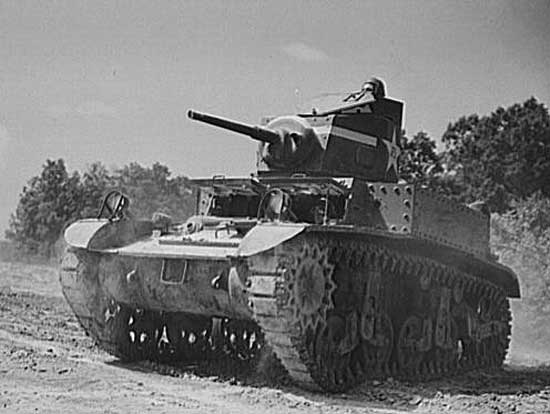
The American component of Blade Force was 54 M3A1 Light Tanks of the 1st Battalion of the 1st Armored Regiment, of the US 1st Armored Division. A unit equipped with Stuart light tanks was chosen because the M3 and M4 medium tank battalions of the 1st Armored Division were too large for the French colonial railway to transport to the Blade Force assembly area.
Advancing into Tunisia, the Eastern Task Force’s northern column contacted German troops on the approaches to Mateur, a major Tunisian road and railroad hub considered to be “the gateway to Bizerte”. With little armor or artillery, the infantry of the northern column quickly became bogged down.
The southern column split into multiple pincers to advance on the town of Madjez el Bab, where a Roman-era bridge spanned the Medjerda River, the largest waterway in northern Tunisia. Here the bridge changed hands multiple times, was partly blown down and then partly re-bridged by opposing engineers during several days of battle.
In the center Anderson gave the Blade Force tankers, both US and British, the rather peculiar order to create a “tank infested area” along the Tine River valley. With a relatively free hand, the 1/1 US Armored Battalion, under the command of Lt. Colonel John Waters, soon-to-be son-in-law to General George Patton, moved forward to conduct a reconnaissance-in-force. The American tankers found little resistance.
THE SET-UP: 25 NOVEMBER
On 25 November Waters had C Company, with 17 Stuart tanks, role up a well-paved road through a small pass at the Eastern end of the Tine River valley. The pass let out near the village of Chouïgui. Using Michelin tourist maps, C Company advanced and performed a reconnaissance of the town of Tebourba, and then turned north to Djedeïda, merrily shooting up small detachments of German and Italian troops they met along the way.
While this was happening, on the Western side of the pass the 1st Battalion HQ tanks shot up two Italian Semoventi da 47 self-propelled “tank hunters”, and A Company tasked two of its three platoons to attack enemy infantry forces in a walled farm north of the pass (later to be named “Coxen’s Farm” by British forces). The attack surely harassed the enemy, but with no infantry of their own, and armed mainly with 37mm “squirrel guns” on their tanks, the US tankers could not push the Germans and Italians out. Not wishing to become embroiled in too great a battle over a pointless bit of ground, A Company recalled its tanks after one was lost to an Italian 47mm AT gun in the cactus between the walled farm and the road.
A Company then underwent a terrific air attack by German planes, with Stuka dive bombers, Junkers Ju-88 twin-engine bombers, and Messerschmitt fighters strafing and dropping bombs. The aircraft came in waves, making no fewer than 9 separate passes over the unit. The results were a single soldier killed, and no tanks lost.
Meanwhile on the other side of the pass, just north of Djedeïda, C Company came upon the newly-activated Luftwaffe airfield from which the very same planes were operating, and quickly formed line and advanced across the field shooting up fighters, bombers, supplies and facilities in what must surely have been one of the most glorious tank raids in history. When the raid was finished they claimed 36 planes and all visible facilities had been destroyed, while one Stuart tank was missing, and two tankers (including a platoon commander) were dead of wounds suffered while guiding their crews from open hatches.
As the day of the 25th ended the 1st Battalion was ordered by Blade Force HQ to place itself on the Tunis side of the pass. Leaving a security detail to watch the pass itself, the battalion set up a defensive perimeter 2 miles south of Chouïgui, in what the tankers would later refer to as the “Wrong Coordinates Bivouac”. Col. Waters, not satisfied with his exposed location, spent a sleepless night driving the 40 miles to Blade Force HQ in Bedja to straighten out the battalion’s orders. Arriving back to the battalion before first light on the 26th, he ordered them back through the pass into the Tine River valley once again.
THE CLASH: 26 NOVEMBER 1942
On Thanksgiving morning, 26 November, Col. Waters moved his troops into position to cover the tactically important Chouïgui Pass. He placed his HQ company at the walled compound known as St. Joseph’s Farm southwest of the pass. He put A Company nearest to the HQ, behind a small rise overlooking the Mateur road. He put B Company just north of the entrance to the pass, also behind a ridge overlooking the road. C Company was placed to guard the eastern opening of the pass.
The morning was spent improving the various companies’ positions. With less than two weeks of combat experience, the US tankers were already disciplined in placing their tanks in hull-down positions with only turrets exposed over the ridgelines, using their camo nets, and digging air-raid slit trenches. They also topped off fuel and ammo to every one of the 55 operational tanks in the battalion. Then the men set themselves to lamenting the mutton and hard-tack that the British 1st Army had provided them for their Thanksgiving rations, and griping about the brass in Algiers who would undoubtedly be getting turkey with all the fixings.
About noon, a lookout at the HQ at St. Joseph’s Farm observed a dust column rising near the known enemy positions at Coxen’s Farm a few miles to the north. The troopers’ binoculars could not distinguish anything specific from that distance, but a close look with a set of French Naval binoculars (which had been “liberated” in Algeria) showed something rather odd. A column of vehicles was approaching, with long “beams” projecting out over their fronts as if they were cranes.
In fact it was a column of three companies of German troops, with some Italian reconnaissance units, marching from Mateur to re-enforce Madjez el Bab. The column was led by tanks of the 190th Panzer Regiment. Up to this time the US Army had no information on the Panzer IV F2 or G models with long 75mm guns (called “Mark 4 Specials” by the British). The initial opinion of the American officers of the 1st Battalion was that they were looking at a German engineering unit marching down the Mateur road right into their laps.
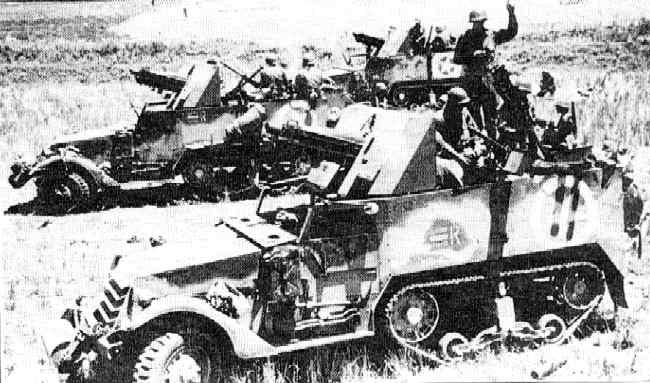
Their misconception was soon corrected as high-velocity 75mm shells began crashing into the area of the battalion HQ. Col. Waters quickly sent word to his units to prepare for action. He then ordered his battalion assault gun battery forward. This unit consisted of three T30 Howitzer Motor Carriages – 75mm howitzers mounted on armored M3 Halftracks. The assault guns engaged the German armor with a brief but furious cannonade, shooting off 10 rounds each (30 total) aimed primarily at the lead Panzer IV, which was repeatedly hit. They then fired smoke, and withdrew safely into an olive grove. As they possessed no armor piercing ammunition, the assault guns put on quite a show but did no notable damage. They did, however, slow the Germans down enough to give the tankers time to prepare for battle.
A Company, with 12 M3 Stuarts, then began advancing and firing on the enemy column. An Italian light vehicle was quickly destroyed. But the Panzers appeared immune to the tank fire. The commander of the 1st platoon, on the right side of A Company, fired more than 18 rounds at a single Panzer IV – and saw the sparks fly as his shells bounced off. The company was quickly crushed, loosing half of its tanks within a few minutes.
But at this point B Company came in to action. The Germans were focused on the A Company tanks advancing and firing to their fronts, and did not notice the line of hull-down tanks close upon their left flank. At close range, and with side- and rear-armor shots, even the “squirrel guns” on the Stuarts did deadly execution. The Panzers were forced to withdraw, leaving the wreckage of 6 Panzer IVs and 1 Panzer III behind.
As the Germans withdrew the Americans pursued. Two German tanks took refuge in the walled farm compound. American tanks burst through the gates and shot the compound up. German and Italian infantry were hunted in the vineyards around the farm compound. That evening the Axis troops in Coxen’s Farm withdrew 8 miles back to Mateur, where their commander was sacked and court-martialled for pulling back without orders.
In the end the Americans and Germans traded almost tank-for-tank. So it might be called a draw. But the Germans tanks were the very newest top-of-the-line mediums, while the Americans were light tanks, and not even the newest at that (the M5 Light was already coming into service to replace the M3 at that time). Also it was the American force which held the ground after the battle, with sufficient strength remaining to continue their fight in the coming days. This was, however, a small-scale engagment, and the win, as it was viewed, may have led to an overconfidence in the first major engagement between US and German units later in the campaign: Kasserine Pass.
FINAL THOUGHTS
The tactics used by Col. Waters will be familiar to military history students. General George Patton described the approach as “hold ‘em by the nose, and kick ‘em in the rear”. (OK, he didn't say 'rear', but kids might read this article). It is a very productive tactic to use, as it takes a very disciplined and experienced tank driver to spare attention to his flanks when there is a tank (or several tanks!) advancing and firing right in front of him. Of course, the overall success of the tactic is small comfort when you are the one tasked to “hold ‘em by the nose”, particularly when you are using a light tank to hold the nose of a medium or heavy!
The M3 Light is familiar to World of Tanks gamers. It is fast and nimble, though rather high and boxy in shape. The 37mm gun has good accuracy up to medium range, and it has good penetrating power compared to other guns of its class. But it is, alas, a small gun, and it is best used on lighter targets. A frontal engagement with an upgraded Panzer III or IV will not be likely to produce a happy result, and it didn’t for the men of A Company.
The Panzer IV used by the 190th Panzer Regiment should also be familiar: The long-barreled 75mm gun provides this platform with impressive anti-armor capabilities. Panzer IVs would handle any frontal engagement with a Stuart without too much fuss. But let a Stuart or two take shots at your side from 100 – 300m range, and you may not be so happy about the results.

There are multiple mentions of Italian Semoventi tank hunters in the accounts of the fighting in and around the Tine River valley. The Semoventi da 47 was a small tank hunter built on the hull of a light tank (the Italian L6/40), mounting a medium-velocity 47mm gun in a lightly armored, small machine.
The American T30 SPG would have had a very high road speed, poor cross-country performance when compared to most tanks, very light armor (not even fully bullet-proof), a poor turning radius with no turn-in-place capability, and a 75mm howitzer.
FOR FURTHER READING
The Tine River Valley was labeled “Happy Valley” by the troops who fought there in recognition of the amount of time they spent under the Luftwaffe’s tender ministrations. But there are numerous other battles in history that also go by this name, and so it is often challenging to find sources amidst the noise. For further reading I suggest:
An Army at Dawn, by Rick Atkinson. This book covers the whole campaign of the US Army in French North African. The clash at Chouïgui Pass appears in chapter 5.
The United States Army in World War II, by the Center for Military History, United States Army. This complete tome may be found free online at http://www.ibiblio.org/hyperwar/USA/. The clash at Chouïgui Pass appears in Chapter 16.
The Battle of Happy Valley, by Capt. Freeland A. Daubin, Jr. This is a paper written in 1948 by the commanding officer of the 1st platoon, A Company, of the 1/1 US Armored Battalion, providing a first-person account of the action. It can be found in the records at either Fort Knox or Fort Benning.
