Fighting Positions: Defence and Displacement.
There is more to a good defence than simply picking what appears to be a good battle postion. According to FM 17-15, the old (1996) US Army tank platoon manual (and the most recent one at time of writing which is approved for general release) one of the characteristics of the defence is flexibility: “A crucial indicator of flexibility is the ability to move quickly under all battlefield conditions, between primary, alternate, and supplementary fighting positions as well as subsequent BPs”
I’ll bet you didn’t know there were so many types of position. To explain:
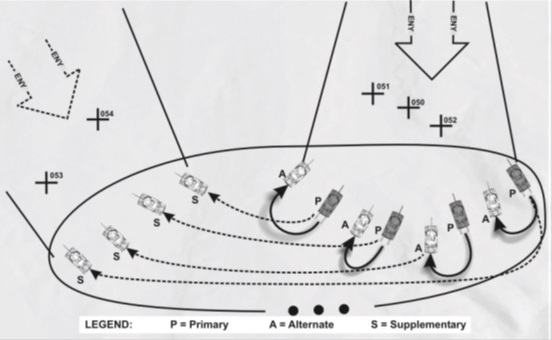
Primary and alternate fighting positions are oriented* on the same sectors of fire. Supplementary fighting positions orient on different sectors of fire. Subsequent BPs are oriented on sectors of fire along the same avenue of approach as the primary/alternate positions. Supplementary BPs are oriented on sectors of fire along different avenues of approach
Battle Positions:
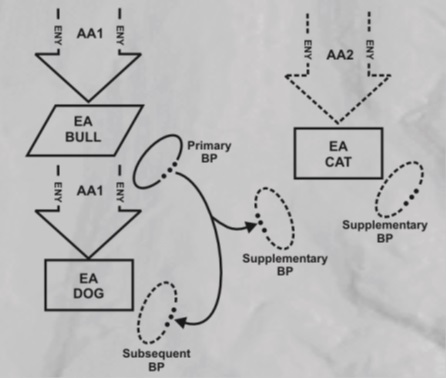
The difference between a fighting position and a battle position is that the latter is an area in which a tank or group of tanks is to be positioned, whilst the fighting position is the individual location that a particular tank chooses to position itself.
Why have so many types of position?
It is very tempting to simply look at the map and choose a favourite position from which to make your stand. When you line up to position yourself to target the enemy’s most likely avenue of advance, such a position may result in your being able to destroy more enemy vehicles coming down that path before being destroyed in turn than any other single position on the map. What’s wrong with that?
Well, the first problem is “what if the enemy decides not to come down the most likely avenue of approach?” It’s all very well hiding behind a rock which gives perfect cover from the NorthEast, but the one time out of five when they come at you from the NorthWest, are you going to be able to affect the battle before you are flanked? If not, maybe one should consider selecting a battle position which has a fair primary and fair supplementary fighting position, as opposed to an excellent primary and no supplementary options at all.
If you have a map which allows for it, there is much to be said for, instead of inflicting maximum damage as soon as possible, trading a bit of space for survivability, and moving around a bit. Once you have engaged the enemy, the chances are that he knows you’re there, and will act to counter an enemy vehicle at that location. You can expect artillery to fall within about 15 seconds, or a flanking maneuver against you.
Tanks can increase their survivability by exposing themselves to the enemy only to the extent necessary to engage him effectively. Minimize exposure by constantly seeking effective available cover, attempting to engage the enemy from the flank, remaining dispersed, firing from multiple positions, and limiting engagement times.
For further details on defilade, see this link
Of the last three items, all are worth noting and often are ignored in the WoT games, usually to the detriment of the defenders.
Remain dispersed:
This link gives an example of the benefits of concentrating firepower. However, and this is often forgotten, it is not required to mass one’s forces in order to mass firepower. Artillery, which isn’t overly accurate at the best of times, particularly high-tier artillery, which has a good ‘splash’ effect from its HE rounds, loves it when forces mass together. Every round’s a winner for them. A good engagement area will allow concentrated fire from multiple distances and directions onto a single target. Not only does having a dispersed defensive line increase the difficulty the enemy has to kill targets, it also adds to the confusion to have multiple rounds impacting from multiple directions. Plus, as a tank turns to deal with a specific defending target, it quite possibly might present a weaker side turret wall to another defending vehicle engaging from a distant fighting position.
If possible, a well dispersed group of tanks will position themselves such that they all complement their engagement ranges. For example, a StuG III with the 75mmL/70 covering an engagement area in company with a KV-2 with the 152mm may well choose to position itself well to the rear of the KV-2, to take advantage of the longer effective range of its gun. If the terrain does not permit this, and both vehicles must position abreast of each other, the StuG should consider holding its fire until the enemy has entered into the engagement range of the KV-2. If it shoots as soon as the enemy is in range of its accurate cannon, it runs the risk of being spotted as the only target available, and will receive the attentions of the combined enemy forces before the KV-2 can effectively contribute to the fight. Then the KV-2 is subsequently left to fight for itself alone, and will likely meet the same unfortunate fate as the StuG. On the principle of “Use your most casualty-producing weapon first”, the StuG would likely be most effective waiting to see the effect of the KV-2s shot, and finishing off the target if required, or immediately switching to the next target if the KV-2’s target has been destroyed. This will both result in a more rapid destruction of the first enemy vehicle, as well as provide two targets instead of one for the enemy survivors to worry about.
Limit engagement times:
The utility of this one may be dependent on the type of vehicle you are using. The historical gunnery standards for an American tank crew for exposure were different for those of an American IFV crew because an Abrams tank can take a hit or two, whilst Bradleys are far less resilient. Bradley crews in particular become proficient in what are known as “berm drills”, moving forwards to a hull-down position to engage a target, falling back behind cover for a bit, so that the enemy turns to engage a more visible target, then moving forwards again to take another shot. Ideally, it will cause indecision paralysis upon the enemy who is trying to play a game of whack-a-mole with your tanks. Especially if you have a fast reload time, there is something to be said for firing two rounds before withdrawing. You are already loaded as soon as you present yourself, so with a reload time of 3 seconds, you can get two shots off in three seconds. Heavy tanks, however, usually can afford to stay exposed for a little while. Until the artillery starts to zero in, of course.
Multiple Positions:
There are two meanings to this one. Firstly, the alternate positions. Eventually, even if you’re doing berm drills, the enemy is going to wisen up, lay on the crest of the hill where you keep popping up, and waiting until you decide to show yourself. Or, even if you don’t show yourself, artillery will lob a round more or less just behind where you had crested. The solution to this one, though it may take a bit more time and reduce your offensive rate of fire, is that after withdrawing out of sight, move to the side a couple of tank lengths to the alternate position, and pop up where the enemy is not already aiming. By the time the enemy has traversed and waited for the aiming circle to decrease, you could well have the opportunity to take the shot and then fall back.
The other meaning to ‘multiple positions’ is the subsequent position. This is particularly feasible on hilly or urban terrain, and relies on the principle of ‘death by a thousand cuts.’ Particularly if you are the weaker vehicle and would take unacceptable damage by standing and fighting, don’t make a final stand, simply take a couple of shots, whittle the enemy down a bit, and then withdraw to the next position and do it again. Hopefully in concert with friendly tanks who have seen the threat and will join you at the next engagement area. The enemy is going to have to honour the concept that you will be remaining in position, unless he sees you leaving, so will be delayed actioning on that location thus giving you time to relocate. This is why a good battle position will have an escape route: A route where the withdrawing tank can move whilst under cover or concealment from enemy eyes. If your battle position has nothing but open space behind you, you have effectively selected a Die-In-Place position: If you stay, you will die. If you try to withdraw in full sight of God and the Enemy, you will die. Maps with rolling hills such as Steppes or Redshire are great for this sort of withdrawal tactic.
So when to displace? FM 17-15 states the following:
“Displacement may become necessary in several types of situations. For example, a numerically superior enemy may force the platoon to displace to a subsequent BP. In another situation, a penetration or enemy advance on a secondary avenue of approach may require the platoon or section to occupy supplementary BPs or fighting positions. […] Disengagement criteria are primarily based on a specified number and type of enemy vehicles reaching a specified location (normally called the break point) to trigger displacement. Other considerations, such as ammunition supplies and friendly combat power, also influence the decision to displace.”
There’s not much to add to that. The problem isn’t with understanding the concept, the problem is that players will get target fixation, especially when they’re apparently doing well on the exchange, and ignore their own displacement criteria. As The Gambler advised for his shot of whiskey, “You got to know when to hold ‘em, know when to fold ‘em, know when to walk away, know when to run. The secret to survivin' is knowing what to throw away, and knowing what to keep.” A successful mobile defense is going to be carried out by a player with the self-discipline to withdraw before the going gets too hot. Or, as often happens, before a 203mm artillery round buries itself in their roof armour.
*Yes, "Oriented". "Orientated" is actually a word, but it is heavily mis-used and not appropriated here
