The effect of a group of tanks concentrating on a single target is greater than the sum of its parts.
Incorrect: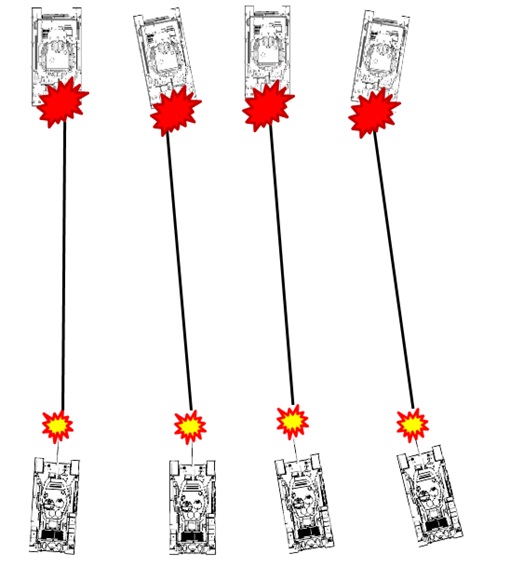
Correct: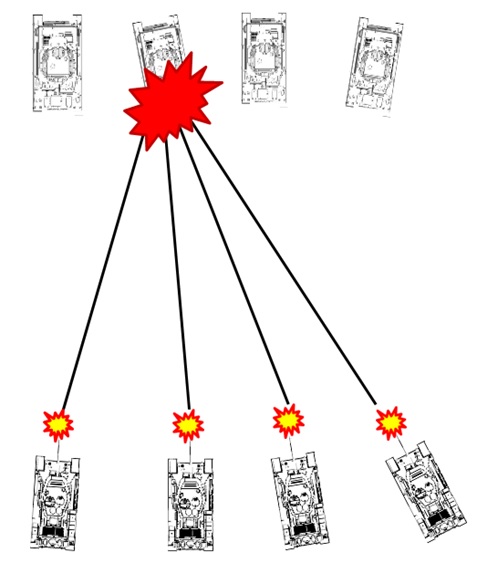
This is a recognized concept from naval strategies in the inter-war period but is something of a game mechanic in World of Tanks. Increases in survivability of battleships after rectifying most of the Jutland-discovered design flaws (i.e. the tendency of battleships to blow up rather spectacularly when hit) resulted in an acceptance that battleships would have to be battered into incapability over time, as opposed to simply being hit and destroyed. As a result, the strategists decided that it was better to rapidly reduce the overall firepower levels of the enemy a small amount, rather than spread the love over all the enemy units.
With the hit-points system in use in WoT, it is important to note that a tank at 1% of its health can still dish out as much damage as a fresh tank. The only way to guarantee a reduction in the amount of firepower coming your way is to destroy an enemy tank completely. The sooner this is done, the better, and that means everyone concentrates on one poor unfortunate.
This is probably best recognized by example.
Take two platoons of three identical tanks. Each tank is at full health, with 900hp apiece. Each tank is identically equipped with guns capable of dishing out 150hp damage on average with the same rates of fire. As you can imagine, if every tank picked an opponent and they started trading shots in pairs, the eventual winner is going to be a toss-up assuming equal skill levels.
Now, let’s start looking at some tables. Let’s assuming that the second tank on one side decides that he’s going to attack the target of one of his colleagues, tank 1.
First exchange:
_________________________________________Tank 1_________________ Tank 2_____________________Tank 3
Friendly Tanks______________________________ 750 ___________________750________________________ 750
Enemy Tanks _______________________________600 ___________________900 ________________________750
Second Exchange:__________________________Tank 1_________________ Tank 2_____________________Tank 3
Friendly Tanks ______________________________600 ____________________600_______________________ 600
Enemy Tanks _______________________________300 ____________________900_______________________ 600
Third Exchange: ____________________________Tank 1_________________ Tank 2_____________________Tank 3
Friendly Tanks ______________________________450 ____________________450_______________________ 450
Enemy Tanks ______________________________Destroyed _______________900 ________________________450
Note that the enemy field is now able to dish out only 300 damage per salvo, whilst the friendly side can still fire a total of 450. At this point, our centre tank switches to the other end of the target array, and helps tank 3 shoot up its target. In the meantime, Tank #1 starts on the next nearest, the one shooting at Tank 2.
Fourth Exchange: ___________________________Tank 1_________________ Tank 2_____________________Tank 3
Friendly Tanks ______________________________450____________________ 300 _______________________300
Enemy Tanks ______________________________Destroyed________________ 750 _______________________150
Tank 3 is capable of finishing off his opponent, so our heroic Tank 2 switches back to the middle.
Fifth Exchange: ____________________________Tank 1_________________ Tank 2_____________________Tank 3
Friendly Tanks _____________________________450 ____________________150 ________________________150
Enemy Tanks ____________________________Destroyed_________________ 450 _____________________Destroyed
With only one target left, all three friendly tanks engage the last survivor, who’s probably cursing the ineptitude of his allies as he’s facing three tanks alone.
Final Exchange ____________________________Tank 1_________________ Tank 2_____________________Tank 3
Friendly Tanks _____________________________450_________________ Destroyed ______________________150
Enemy Tanks ____________________________Destroyed _____________ Destroyed ____________________Destroyed
Our heroic Tank 2 has sacrificed himself for the good of the cause, but the exchange was a victory because he ignored the threat to himself and doubled up on an enemy. Tank 3 isn’t feeling too great, and Tank 1 is down to half strength. Still, a win’s a win. 2,700 points of damage caused, to 2,100 received.
But they could have done better. Let’s do it again, except this time our friendly team concentrates all firepower on one target at a time, working left to right.
First Exchange____________________________Tank 1_________________ Tank 2_____________________Tank 3
Friendly Tanks _____________________________750___________________ 750_______________________ 750
Enemy Tanks ______________________________450 ___________________900_______________________ 900
Second Exchange: _________________________Tank 1_________________ Tank 2_____________________Tank 3
Friendly Tanks_____________________________ 600____________________ 600 _______________________600
Enemy Tanks _____________________________Destroyed________________ 900 _______________________900
After two salvoes, the enemy team is already down to just two tanks. All friendly tanks now focus on enemy tank #2.
Third Exchange ____________________________Tank 1_________________ Tank 2_____________________Tank 3
Friendly Tanks _____________________________600____________________ 450 ________________________450
Enemy Tanks ____________________________Destroyed _________________450 ________________________900
Fourth Exchange ___________________________Tank 1_________________ Tank 2_____________________Tank 3
Friendly Tanks _____________________________600_____________________300________________________300
Enemy Tanks ____________________________Destroyed _______________Destroyed _____________________900
Two enemy tanks down, and one to go.
Fifth Exchange ____________________________Tank 1_________________ Tank 2_____________________Tank 3
Friendly Tanks _____________________________600____________________ 300 _______________________150
Enemy Tanks ____________________________Destroyed ______________Destroyed ____________________450
Final Exchange_____________________________Tank 1_________________ Tank 2_____________________Tank 3
Friendly Tanks _____________________________ 600 ____________________300_____________________Destroyed
Enemy Tanks____________________________ Destroyed_______________ Destroyed _________________Destroyed
As you can see, this time the team is a little bit better off. It’s still down to two tanks, but one of them still has most of its hp left, and the other can at least survive a hit. Or, in other words, in exchange for the 2,700 points of damage caused, the team only took 1,800 points.
Of course, this philosophy of concentration of force only applies when you’re actually capable of damaging the target. If you can’t effectively add to the pile-in, then consider either easier prey or just going and finding something else to do instead, such as finding artillery.
As far as selecting which target to pile on first, that’s more a matter of some debate. There is much to be said for removing the biggest, meanest enemy first and then mopping up the small guys, but on the other hand, there is also something to be said for swatting the annoyances out of the way first so that they can no longer contribute to causing your side damage whilst you continue to knock down the big enemy tanks. This latter particularly so when they’re capable of inflicting critical hits with HE, which could be damage out of proportion to their nominal effect.
It took until the American Civil War before people copped onto the concept that it was not necessary to mass forces in order to mass firepower. If you have a gun capable of stand-off shooting, there’s no particular need to join the melee up close. This is, in particular, artillery’s reason for existence.
A note on the spotting mechanics
In the ‘characteristics’ window on your tank, towards the bottom, is a statistic called ‘View Range.’ This is the maximum distance that your tank can spot an enemy. If your view range is longer than that of the opposing vehicle, there may be a window wherein you can see him, but he cannot see you. By being stationary or using camouflage and/or concealment, you can further reduce the opposition’s effective view range against you. In extremis, this means that you can repeatedly shoot at an enemy and the only indication he might have as to where you are is the red ‘you’re being hit from this direction’ indicator.
Should you find yourself on the receiving end of such fire, you must make a quick decision. Either find cover, or charge in the direction of the incoming fire in the hope that you survive long enough to spot your antagonist. Either choice is better than just sitting still in the hope that you will eventually divine the enemy’s location.
The detailed version of this is available on the Wiki, but this will get you started.
The maximum range at which you can spot an enemy is 500m. As few vehicles actually have a spotting range of that distance, it usually requires that the vehicle be equipped with additional characteristics such as enhanced optics before you can do so. As a general rule, whatever the ‘view range’ is under the characteristics of your vehicle should be considered the maximum practical view range at which you can spot an enemy. Usually, open-topped or heavy vehicles will have larger view ranges, either due to the ease of looking out of them or the fact that heavies tended to get better optics. Bear in mind, however, that this is a case of spotting under ideal conditions, such as a large vehicle moving and shooting in the open. Such ideal conditions rarely present themselves, and you can expect your enemy to attempt to minimize their exposure.
The simplest way of minimizing susceptibility to being spotted is to hide, stationary. There are plenty of bushes scattered around the World of Tanks battlefield, and they provide a camouflage bonus. Hiding just behind a bush can reduce the enemy’s effective view range by up to 60%. Other attributes can be combined on top of this, such as the use of a camo net or training crewmen in the camouflage secondary skill. Of course, shooting is going to make you somewhat more visible, but only somewhat, and the effect is but temporary. It is possible for vehicles to 'disappear' in open view. Game mechanic.
Vehicle characteristics will of themselves also have an effect. There is a (hidden) modifier for every vehicle. As a result, it is much easier for a small vehicle such as a StuG to hide than something the size of a small apartment building (i.e. Maus). This modifier is always in effect, so all other things being equal, a given enemy will always be able to spot a Maus before he spots the StuG. This modifier usually also takes into account vehicle class: Tank destroyers, due to their doctrinal role (and additional crew training) of ambushing targets, for example, tend to get a higher modifier than tanks.
It doesn’t stop there, however. If you work in hunter-killer teams, you can engage targets much further away than your own spotting range. This is where the radios come in: Just under the ‘View Range’ characteristic is one for ‘Radio Range.’ This particular attribute is easily modifiable, and you can usually upgrade the radio on your vehicle to increase it. Sometimes upgrading a turret will increase your view range, not always. The radio range basically creates a ‘circle of communication’ around your vehicle. If your circle overlaps with the circle of another vehicle, then you may be able to see enemy vehicles which have been spotted by that other vehicle, up to a maximum of 700m. If equipped with an accurate gun, this can be devastating. For example, StuG III has a view range of only 350m, but the 75mm/L70 cannon is accurate and lethal at very long ranges. By using a spotter, the StuG, which can be hard to find at the best of times, can be killing targets half-way across the map. Even if the unfortunate victim attempts to charge in the direction that the rounds are coming from, he is unlikely to close the distance sufficiently to spot the StuG before dying. A cagey spotting vehicle may never fire at all, thus reducing his own vulnerability to being spotted, whilst the long-distance shooter does the heavy work. Note that if you ‘spot’ for another vehicle to engage, you will split the experience points gained from engaging that target with the player doing the shooting.
Radios are all-important for artillery pieces and scouts. There’s little point in scouts detecting targets if they can’t ‘tell anyone’ about them, and artillery can’t use their long gun range if nobody can reach them on the radio.
