Always a controversial subject for some reason, artillery is a reality whether you like it or not. Here's the backstory as to how it works and some ideas on using it (And, by extension, what to know if you may be on the receiving end).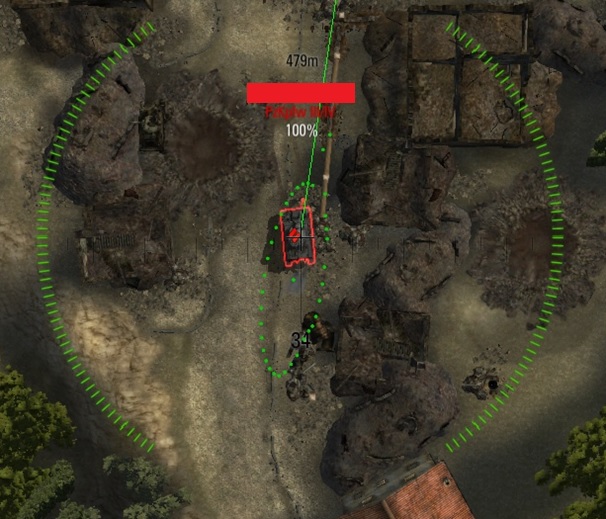
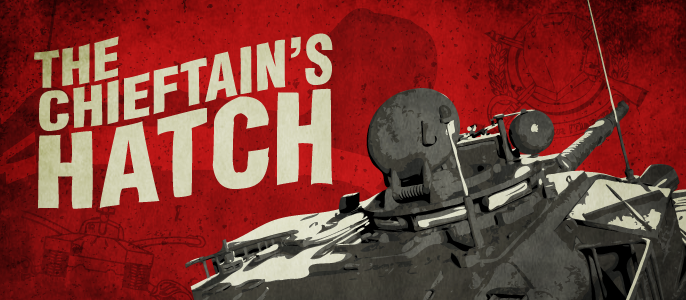
In the picture above the oval of green dots indicates the impact zone within which the shell is liable to impact. Remember, the shell does not impact straight down, hence the elongated shape. As a result, if the round was going to impact with the ground just behind the MkIV, it quite likely would actually impact the turret. If the MkIV does not move in the next second and a half or so, it is quite liable to receive a 150mm round, and, of course, it has no way of knowing it. This seems a little harsh at first but the big picture says otherwise. Note the picture below.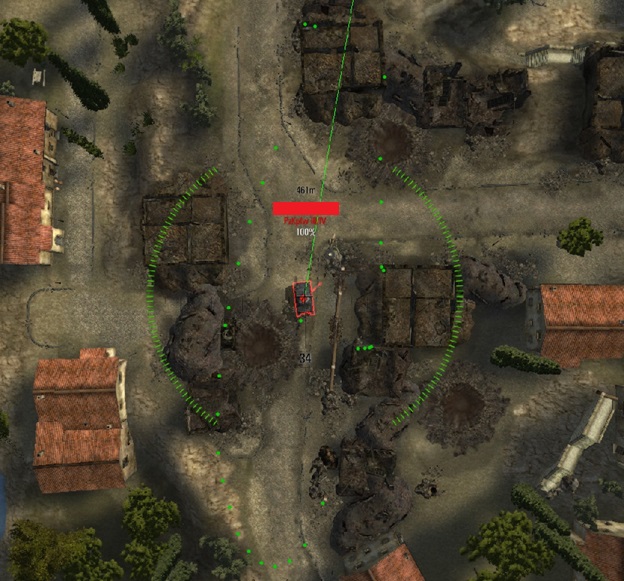
This is the same MkIV being targeted some ten seconds earlier. You will note that the impact zone is huge. The round is far more likely to land anywhere except on the target vehicle. Not to say it won’t, as lucky shots do happen, but the artillery gunner pulling the trigger with this sight picture would be an exercise of optimism over expectation. Every time the SPG moves its hull, the probable impact zone expands to maximum. As most artillery pieces tend to have very narrow arcs of fire, this generally means that the gunner needs to reset his (or her!) aim almost every time it acquires a new target or his current target moves a significant lateral distance relative to the SPG. As a result, SPGs tend to have much lower rates of fire than the stats would lead one to expect. Not only do they tend to have a long reload time (over 30 seconds for some of the larger pieces), but they also need to spend significant time (ten seconds or more) just aiming. As a result, artillerymen love stationary targets.
When you do feel the need to be stationary for anything more than about fifteen seconds (not that you can’t get hit in less!), you still have options. Hide, or use cover. Hiding needs little explanation: Use concealment to prevent enemy scouts or vehicles from detecting you.
Cover takes advantage of the fact that, though artillery does come down from above, it does not do so vertically. See the example below.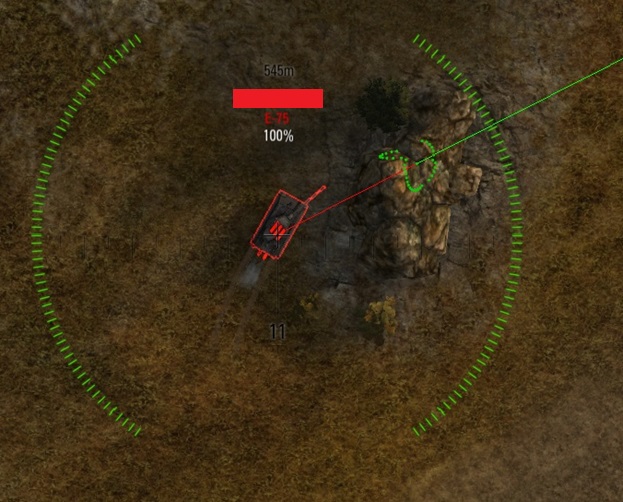
You will note that the green ‘impact zone’ is on the rock formation to the right of the tank. This tank is fully shielded from the artillery at its current point of aim. Of course, the gunner can aim a little towards the front of the target, and likely hit or damage the tank by near miss if the tank stays still for much longer, but then the tank can also move to hug the cover a little more tightly.
So, as artillery, what can you do to counter?
This ought to be a pretty familiar view to any artilleryman who’s played on the Malinovka map.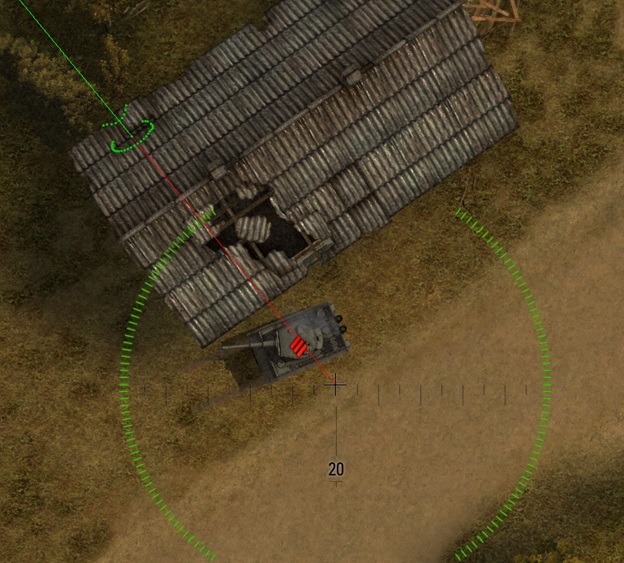
The MkVI is taking cover, confident in the knowledge that artillery, in their usual firing positions, cannot touch him. The solution as a gunner is simple. Move: You are self-propelled artillery for a reason. A good team in Malinovka can clear the way to relocate to a better firing position.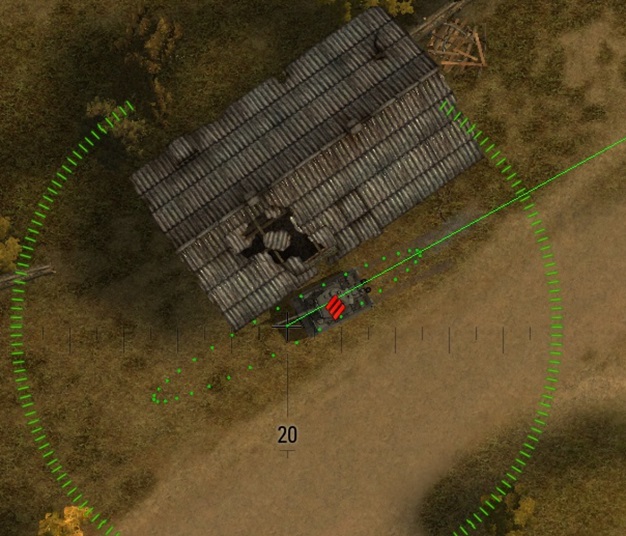
Many tankers have had their feeling of invulnerability shattered by being heavily damaged or destroyed by artillery that they ‘knew’ shouldn’t have been able to hit them. Recall what was said about stationary targets: This Tiger driver stayed in the same defensive location so long that the artillery was able to drive half-way across the map to get the correct angle.
The other thing to note about moving as an arty-driver is that enemy scouts will usually go first to where the artillery players tend to set up near the deployment zone. Remember, as artillery, you are a priority target. The best way to avoid having enemy artillery hit you when the scout sees you is to prevent the scout from finding you in the first place. When found, your survival chances are very low indeed.
Personal observations for arty players: This is a way of doing things, not the way of doing things.
1) Don't hang out in the spawn zone. If you're in a slow arty, you'll be shooting less frequently as you're moving, but it is worth it to go somewhere else. Moving well away from where you started means that enemy scouts will be hunting for a while before they find you.
2) When conducting 1), as long as the ballistic arc allows for it, you should be as close to the front line for all arties as you feel safe. Especially if you're in something with a wide arc of fire. This is for four reasons.
a) Shorter time of flight. Especially useful for hitting those peek-a-boom or evading targets.
b) Much smaller area covered by the impact circle/oval, meaning far more chance of a hit.
c) You are probably going to open up new angles of fire on targets (especially across the map) who think they're safe from the usual artillery haunts.
d) If an enemy scout gets through the front lines, not only are you not in the first place they look, you are also much closer to help from your friends.
3) Try to get an 'angle'. Don't just drive from spawn to the front line, move laterally to obtain new angles on targets which otherwise would be obscured.
4) Choose your targets wisely. Sometimes it is better to take a weak gun out of the fight than do major damage to a heavy. You can affect one of multiple engagements, you are a force multiplier. Always keep an eye out for an intelligent scout on your side who is pinging a request for fire. Knock out the obstacle for him, and he may go marauding.
5) Arty is far better at cracking defensive positions than at helping with defense. I usually believe in supporting the attack anyway, as I believe victory goes to the side with initiative, and the more help the initiative gets, the more successful the team is.
6) If you see a useful target cowering behind cover in an attempt to be "Arty safe", consider moving a little to open an angle to hit him. Don't worry if you lose the spot, just aim where he was last seen. Such players tend to be stationary, and are likely to still be there, take the blind shot.
7) If you have the credits to burn, consider randomly lobbing shots at likely locations if there are no spotted targets. You get no extra XP for hit rate or bringing ammo home. Even if a target appears the second after you pull the trigger, usually by the time your aiming circle has shrunk on the new target, your round is loaded again anyway.
8) Minimap. Minimap. Minimap. Chances are you have a little more time for Situational Awareness than most of your team. It will help you choose targets, and you can call pieces of information to your colleagues who may be too busy to play close attention.
9) This is related to #2. If you find yourself in a fight for your survival against a scout or medium, 3 time out of 4 you will lose and die. Usually it's not worth the attempt. Instead, find the nearest green guy, and drive at him as fast as possible like a panicked schoolgirl while screaming for help. He may not come back to help you, but If you bring the scout to him, he could scratch your back. You are much more likely to make it, especially in a slow arty, if you're closer to your friends to begin with.
- Failed to log in. Log in or create account
- My Profile Log out
-
Close
- Tournaments

This product is not licensed, endorsed, and/or affiliated with any branch of federal, state, and/or sovereign government, or any military branch or service thereof, throughout the world. All trademarks and trademark rights pertaining to military vehicles are proprietary to the respective rights holders. Reference to a particular make, model, manufacturer, and/or version of any military vehicle is for historical accuracy only, and does not indicate any sponsorship or endorsement of any trademark owner whatsoever. Characteristics of all models are realistically reproduced on the basis of technical elements of military vehicles from the 20th century. All trademarks and trademark rights pertaining to military vehicles are proprietary to the respective rights holders.
© 2009–2026 Wargaming.net All rights reserved.